![mAIscribe - main logo - hi-res (4000 x 1000 px).png]](https://help.maiscribe.com.au/hs-fs/hubfs/mAIscribe%20-%20main%20logo%20-%20hi-res%20(4000%20x%201000%20px).png?width=200&height=50&name=mAIscribe%20-%20main%20logo%20-%20hi-res%20(4000%20x%201000%20px).png)
To achieve accurate transcription, it is crucial for mAIscribe to receive clear audio input. A key step in this process is ensuring that your audio input settings are properly configured.
The quality of the audio input directly impacts the output quality; therefore, we strongly recommend that clinicians invest in a high-quality microphone.
We recommend using a multi-directional, noise-cancelling microphone to effectively reduce background noise and accommodate conversations involving multiple speakers, ideally with a range of at least 2 meters.
Our preferred choice is the Jabra Speak2 55 UC, which our co-founders utilise in their own clinics and have found to deliver excellent performance.
We've noticed that RODE USB microphones are performing poorly
How to Connect Your Microphone:
- Connect your microphone to your device
- Plug your microphone into your device (via USB or audio jack) or connect it via Bluetooth.
- Follow the setup instructions of your device (if any)
- See below the details to make sure your microphone is connected properly
Step 1: Check Your Microphone is Detected
Mac (Built-in or External Microphone)
-
Click the Apple menu and go to System Settings.
-
Select Sound > Input.
-
Look for your microphone in the list:
-
If using the built-in microphone, ensure iMac/MacBook Microphone is selected.
-
If using an external microphone, confirm it appears and is selected.
-
-
Speak into the microphone and check if the input level bar moves.
-
If no movement, try increasing the Input Volume slider.
-
Windows (Built-in or External Microphone)
-
Right-click the Speaker icon 🔊 in the taskbar and select Sound settings.
-
Scroll down to Input and look for your microphone under Choose a device for speaking or recording.
-
If using the built-in microphone, select Microphone (Internal).
-
If using an external microphone, make sure it appears and is selected.
-
-
Speak into the microphone and check the Test your microphone bar for activity.
-
If there’s no movement, increase the Microphone volume in Device properties.
-
🔹 If your microphone is not detected:
-
Disconnect and reconnect an external microphone.
-
Restart your computer and check again.
Step 2: Ensure Microphone Access is Enabled
Mac: Allow Microphone Access for Your Browser
-
Go to System Settings > Privacy & Security > Microphone.
-
Ensure your web browser (e.g., Chrome, Safari, Edge) is enabled.
Windows: Allow Microphone Access for Your Browser
-
Open Settings > Privacy & security.
-
Click Microphone and ensure Microphone access is ON.
-
Scroll down and ensure your web browser is listed and enabled.
Step 3: Check Your Browser Settings
- Open Google Chrome
- Go to mAIscribe
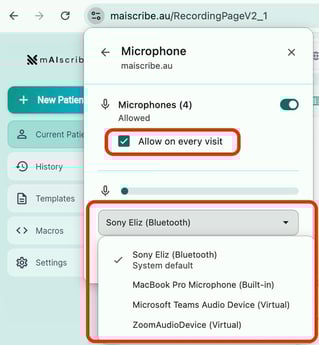
- When asked to allow Google Chrome to use your microphone, select Allow - make sure you "Allow on every visit"
- Click the lock
 icon in the address bar.
Ensure Microphone access is Allowed.

If you have only one microphone connected, you simply need to allow it:

But if you have more than one, make sure you have the correct one selected!
Fix problems with your microphone
A simple initial step is to ensure that your microphone is firmly connected to your device. If it is properly connected, proceed with the troubleshooting options outlined below.
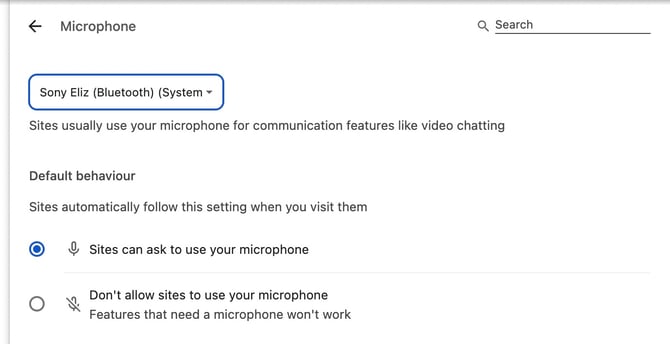
Check your Google Chrome settings:
- Open Google Chrome
- At the top right, click
→ Settings
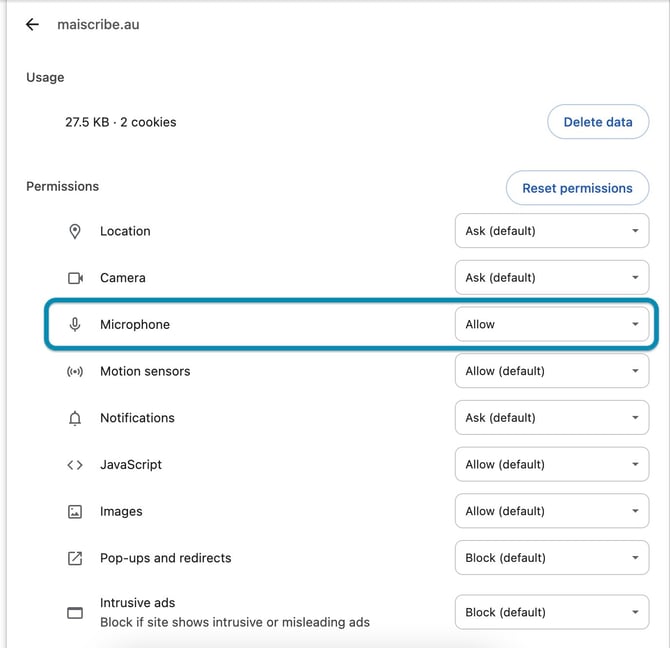
- Click Privacy and security → Site settings → Microphone
- Check if you have the correct microphone selected
- Check that the mAIscribe address is in the 'allowed to use' list.
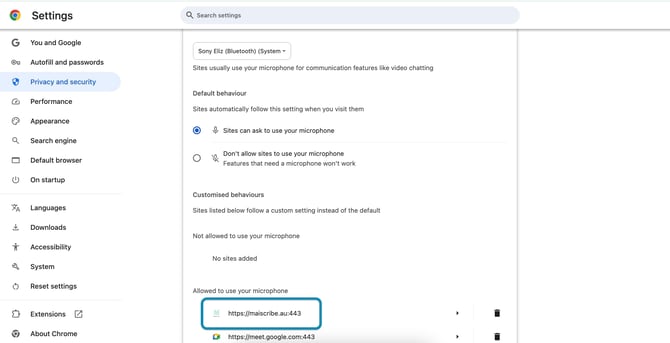
- If the mAIscribe address is not listed as 'Allowed to use', click on it and change the dropdown menu next to 'Microphone' to 'Allow'.
The steps above should ensure your microphone is connected and working, but if you are still having issues, try the options below.
Troubleshooting: Fix Low or No Audio Pickup
Mac
-
Go to System Settings > Sound > Input.
-
Increase the Input Volume slider.
-
If using an external microphone, unplug and reconnect it.
Windows
-
Open Control Panel > Sound > Recording.
-
Select your microphone and click Properties.
-
Under the Levels tab, increase the Microphone volume.
-
Disable Microphone Enhancements if they are enabled.
Avoid Common Issues
✅ Do not mute your microphone
-
Check your physical microphone (if external) for a mute switch.
-
Some headsets have a mute button—double-check if it’s on.
✅ Prevent browser conflicts
-
Close any other tabs or apps using the microphone (e.g., Zoom, Teams).
✅ Check internet speed & stability
- A slow connection can cause delays or audio dropouts.
- If needed, restart your Wi-Fi router.
Final Step: Restart Everything
-
Restart your browser and try again.
-
Restart your computer if the issue persists.